|
How to
Burn a DVD Video Disk |
| Step 1: Convert
Media file to DVD
with Super DVD Creator.
Step 2: Create *.VOB, *.IFO
with IfoEdit ( IfoEdit.exe is a
freeware )
Step 3:
How to burn DVD into a DVD-R / DVD+R / DVD-RW /
DVD+RW
|
| Step
1: Convert Media
file
to DVD media file with Super DVD
Creator |
|
Tools required:
Latest Super
DVD Creator
Launch Super
DVD Creator , you will see the UI below.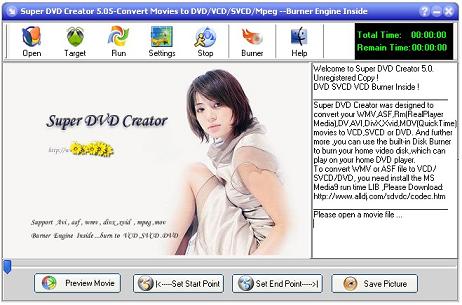
1. Click "Open
" button to
open your source file (Avi ,Mpg,Divx,Xvid,ASF,WMV,MOV,RM,RMVB
) .
2 Click "Target"
button to save the output file to your hard disk. and click
"OK" button .
3. then the "output settings"
window will pop up automatically.
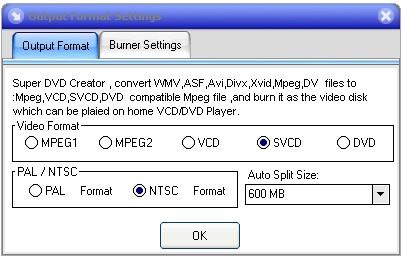
At this step ,you must
choose the "DVD" format . then
click the OK button.
4. then the program return to the main window.
at this step please click "Run" button to start DVD
conversion . please wait for the end.
Note:
a. Three kinds of files are created by
Super DVD Creator . ("*.mpg" is a mpeg file in DVD specification,
it contains Video and Audio; "*.m2v" is a MPEG2 video file, it
only contains video; "*.m2a" is a audio file in Mpeg1 Layer 2 format, it
only contains audio.)
b. The .m2v and .m2a file will be used in
the following step.
|
| Step 2: Create *.VOB, *.IFO ,DVD Disk
Image with
IfoEdit (IfoEdit is a freeware) |
Tools required: IfoEdit 0.96 or later,
get it here.
Launch IfoEdit 0.96 (0.96 for example), you will see the UI below.
1. Click "DVD
Author/Author New DVD".

After click "Author New DVD", you will see the UI below
2. Click the button to open your Video file, which has been
created by Super DVD Creator *.m2v file.
3. Click the button to open your Audio file, which has
been created by Super DVD Creator *.m2a file.
4. Select a destination, any drive root with the folder
name "VIDEO_TS". Be sure that you have enough hard disk space, if
your mpeg and audio files are 4.37 GB it requires same free space.
The folder name "VIDEO_TS" must be capital letters.
5. Click
"OK" button, Ifoedit will start generating the DVD
structure(vob and ifo files), it will take some time if you are
creating a full DVD.
6. Click "Disk Image" in the
IfoEdit.exe main window , and save the Disk
Image file to your hard disk. 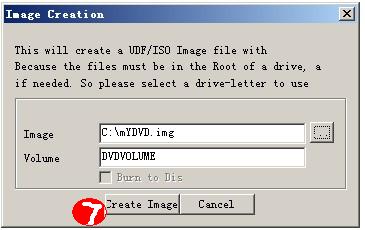
the Img file will be used in
the following step |
| Step
3 :How to Burn DVD Vido Disk onto a DVD-R/DVD+R/DVD-RW/DVD+RW
With Super DVD Creator |
| When the Super DVD Creator
finished the conversion of DVD . the DVD Burner window will pop up automatically.
First : please insert a DVD write able disk
to your DVD Writer Rom.( not the CD Disk) .
1. choose your DVD Writer in the drop
down box .
2. Choose the max write speed.
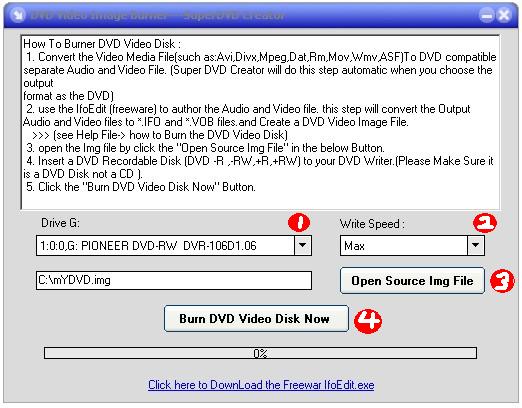
3. click the "Open Source Img File" to open the *.Img
file (we created with the IfoEdit.exe)
4. click the "Burn DVD Video Disk Now" to start Burn .
Note : the burn task will take some time if you are
creating a full DVD.
do not terminate the burn when it burn the "LEADOUT TRACK
".
after the task finished . the sotware will tell you,and eject
your DVD Disk
Done
| VCD
specification |
DVD
specification |
SVCD
specification |
NTSC:
Horzontal width:
352
Vertical height: 240
Frames per second:
29.97
Colour depth: 24 or 32 bits
PAL:
Horzontal
width: 352
Vertical height: 288
Frames per second:
25
Colour depth: 24 or 32 bits |
NTSC:
Horzontal width:
720
Vertical height: 480
Frames per second:
29.97
Colour depth: 24 or 32 bits
PAL:
Horzontal
width: 720
Vertical height: 576
Frames per second:
25
Colour depth: 24 or 32 bits |
NTSC:
Horzontal width:
480
Vertical height: 480
Frames per second:
29.97
Colour depth: 24 or 32 bits
PAL:
Horzontal
width: 480
Vertical height: 576
Frames per second:
25
Colour depth: 24 or 32
bits |
|
| BTW : How to burn DVD onto a DVD-R / DVD+R /
DVD-RW / DVD+RW with Nero 5.5+ |
Tools required:
Nero 5.5 or later, get the demo here.
Launch Nero.
Please click "Close Wizard" button, you will see the UI
below.
1. Select DVD
2. Select
"DVD-Video" icon
3. Click "New" button.
After you click "New" button, you will see the UI below.
4. In "File Browser" window, open your "VIDEO_TS" folder
and select all the files in it.
5. Drag them(see picture
below) into "DVDVideo1_DVD" window. Drop all the files into
"VIDEO_TS" folder
6. Select File->Write CD or click
"Open the write cd dialog..." button at "6".
After you click "Write CD", you will see the
UI below.
6. Mark the
check box of "Write".
7. Select Write speed, lower may
work better if you get problem on playing the DVD.
8. Click
"Write" button.
Done.
|
|
|
Copyright © 2003
MasterSoft Inc.
All rights reserved. | |